Share Now:

Body Measurements
Taking Body Measurements for Clothing… Keep accurate measurements for yourself and other family members, and use them as a reference when buying or making clothes. When taking a person’s body measurements, be sure that he or she is standing straight. When you go shopping to buy clothes, carry the body measurements with you.
Taking accurate body measurements is an essential part of finding clothes that fit well and look great. Whether you are ordering custom clothing, buying clothes online, or making your own clothes, knowing your measurements is crucial.
Woman’s Body Measurements
Taking accurate body measurements is essential for anyone who wants to make well-fitting clothing. In particular, taking women’s body measurements can be a bit more complex due to the many different shapes and sizes that women come in. Here is a step-by-step guide on how to take accurate body measurements for women.
Step 1: Gather Your Materials:
Before you begin, make sure you have a soft measuring tape and a notepad, and a pen to record your measurements.
Step 2: Identify the Key Measurements:
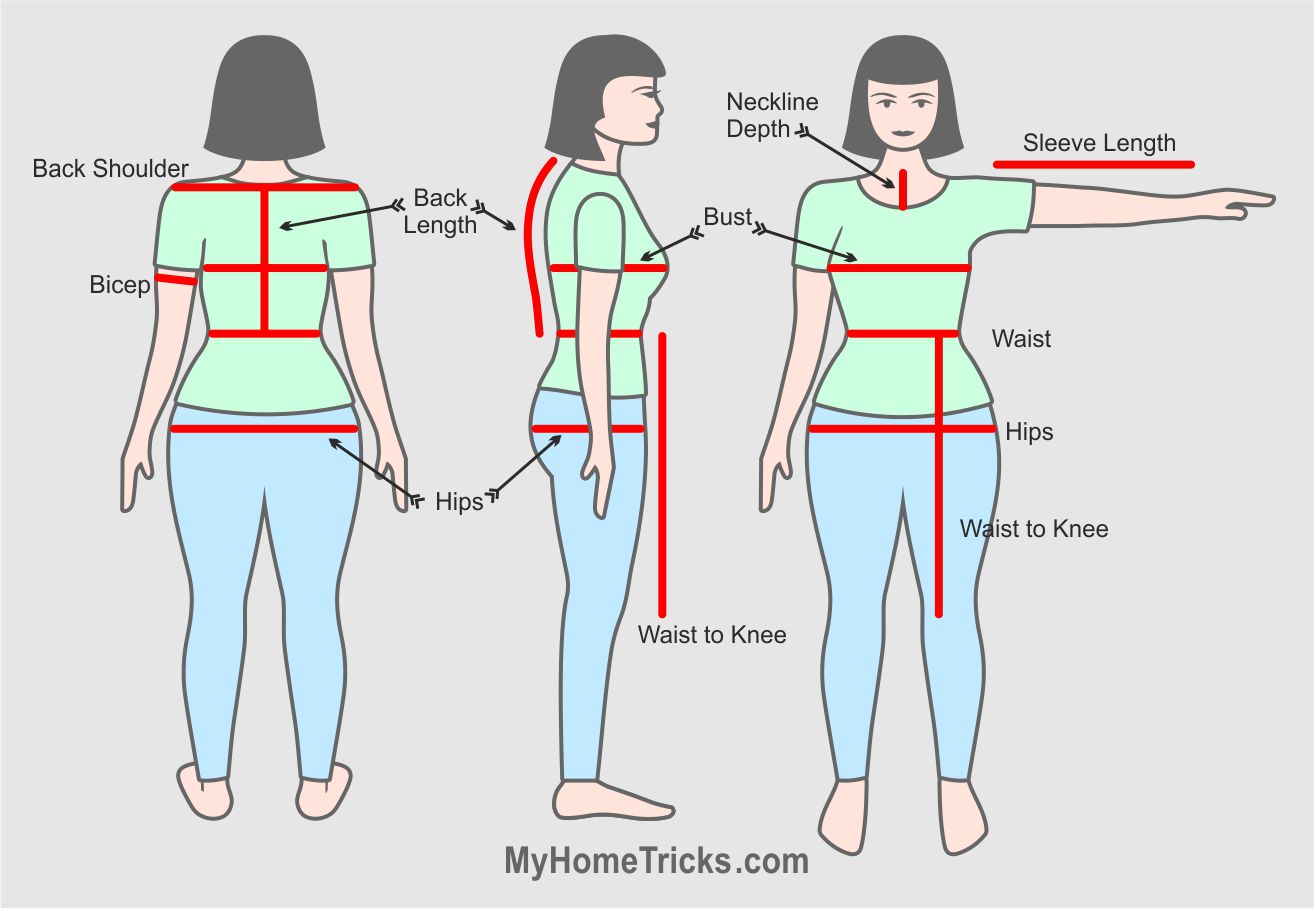
There are several key measurements that you will need to take. These include:
- Bust: Measure around the fullest part of the bust, making sure the tape is level around the back.
- Waist: Measure around the narrowest part of the waist, which is usually just above the belly button.
- Hips: Measure around the fullest part of the hips, which is usually around the top of the hip bones.
- Inseam: Measure from the top of the inside of the leg down to the floor.
- Height: Measure from the top of the head down to the floor.
Step 3: Get the Right Posture:
It’s important to ensure that the person being measured is standing up straight, with their feet shoulder-width apart and their arms relaxed by their sides.
Step 4: Take the Measurements:
Using the soft measuring tape, take each measurement and record it on your notepad. Make sure the tape is snug but not too tight, and that it is parallel to the floor.
Step 5: Double-Check the Measurements:
Once you have taken all of the measurements, double-check them to make sure they are accurate. If there are any discrepancies, re-take the measurement to ensure it is correct.
Step 6: Use the Measurements:
Now that you have accurate measurements, you can use them to create patterns or to purchase clothing that will fit well. Keep the measurements in a safe place so that you can refer to them in the future.
Taking accurate body measurements is an essential part of creating well-fitting clothing. By following these steps, you can ensure that you have the correct measurements and that the clothing you create or purchase will fit properly.
Man’s Body Measurements
Here’s a step-by-step guide to taking man’s body measurements for clothing:
Step 1: Start with a tape measure: Choose a flexible tape measure made of cloth or plastic and measure in centimeters or inches, depending on your preference.
Step 2: Take the chest measurement: Wrap the tape measure around the widest part of your chest, under your armpits, and across your shoulder blades. Make sure the tape measure is snug but not too tight.
Step 3: Measure your waist: Wrap the tape measure around your natural waistline, which is the narrowest part of your torso. This is usually located just above the belly button.
Step 4: Take the hip measurement: Wrap the tape measure around the widest part of your hips, usually around the hip bones.
Step 5: Measure the inseam: Stand with your feet shoulder-width apart and measure from your crotch to the bottom of your ankle bone.
Step 6: Take the sleeve length measurement: Hold your arm out to the side and bend your elbow at a 90-degree angle. Measure from the center of the back of your neck to your wrist, passing over your bent elbow.
Step 7: Measure your neck: Wrap the tape measure around the base of your neck, just below your Adam’s apple.
Step 8: Measure your shoulder width: Measure from the end of one shoulder to the end of the other shoulder, across the back.
Step 9: Take the outseam measurement: Measure from your waist to the bottom of your ankle bone, following the outside of your leg.
Step 10: Finally, double-check your measurements: Make sure you have taken all the measurements accurately and write them down to avoid forgetting them.
Following these simple steps will help you get the perfect fit when shopping for clothes. Remember, taking accurate body measurements is essential to ensure your clothes fit you perfectly and look their best.

Child’s Body Measurements
Taking your child’s body measurements for clothing can seem like a daunting task, but with a few simple steps, you can ensure a perfect fit every time. Here is a step-by-step guide on how to take your child’s body measurements for clothing.
Step 1: Gather your tools:
Before you start measuring, you’ll need a few essential tools, including a measuring tape, a notepad, and a pen or pencil.
Step 2: Dress your child in form-fitting clothing:
For accurate measurements, it’s best to dress your child in form-fitting clothing, such as leggings and a t-shirt. Loose-fitting clothing can make it difficult to get accurate measurements.
Step 3: Measure the chest:
Starting at the fullest part of your child’s chest, wrap the measuring tape around their back and bring it back to the front. Make sure the tape is parallel to the ground and snug but not tight. Record this measurement.
Step 4: Measure the waist:
Measure the narrowest part of your child’s waist, usually just above the belly button. Again, make sure the measuring tape is snug but not tight and parallel to the ground. Record this measurement.
Step 5: Measure the hips:
For this measurement, measure around the widest part of your child’s hips. Again, make sure the tape is parallel to the ground and snug but not tight. Record this measurement.
Step 6: Measure the inseam:
Have your child stand with their legs shoulder-width apart and measure from the top of their inner thigh down to their ankle. Record this measurement.
Step 7: Measure the height:
Measure your child’s height by having them stand with their back against a wall and marking the top of their head with a pencil. Measure from the floor to the mark. Record this measurement.
By following these simple steps, you can get accurate measurements for your child’s clothing. Keep these measurements on hand when shopping for clothes, so you can be sure you’re getting the right size every time. Revise children’s body measurements frequently, and always have their shoe sizes tested by professional fitters.
Tip: For more information on the Body Measurements issue, which we have partly handled here, click on the “tags” below.